


Jeff Doubet shares Spanish clay vent installation photos and and how-to info as well as where to buy products for your home. Weatherproofing and plastering around clay pipe vents is also covered. Whether you are remodeling or building new, this is a helpful visual guide to see how the professional trades install clay pipe vents.
LISTEN TO JEFF DOUBÉT NARRATE THE FEATURED PHOTO, ABOVE.
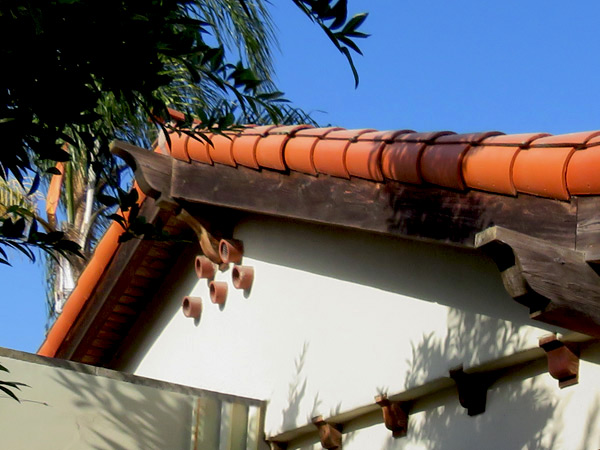
Clay vents are an aesthetic and functional detail found in a wide range of classic Spanish-style architecture. These photos are organized in a way as to show you how to install your own Spanish clay attic vents, from start to finish!

Not only are clay vents a decorative way to dress up your home- there are other surprising functional uses. Scroll to learn more, and be sure to check out other projects with terracotta clay vents. On this project we used a clay vent to aesthetically hide the appearance of a bathroom fan vent. To do so, the General Contractor ran flex ducting from the ceiling fan to the backside of the far right clay vent, above.
As an Amazon Associate, I earn commissions from qualifying purchases.
Where to Buy Clay Vent Pipe for your Spanish Home project
The Spanish terracotta clay vents can be purchased at Santa Barbara Stone located at 27 North Nopal St. Santa Barbara, CA. 93103. These “decorative” component parts are actually old school clay drain pipes. Many of these clay drains still exist throughout the historic neighborhoods of Santa Barbara.

You can buy the 6″ x 12″ (1″ wall thickness) round clay drain pipe and Hexagon shape pipe at Santa Barbara Stone. I used the Hexagon design for this custom Spanish shed project.
Clay Vent Installation Planning For Your Own Spanish Home
For a hundred years Santa Barbara Home Designers + Architects have been specifying, planning and incorporating clay drain pipe into their projects. They can be used as attic vents, and other decorative elements such as patio walls and wine bottle storage.
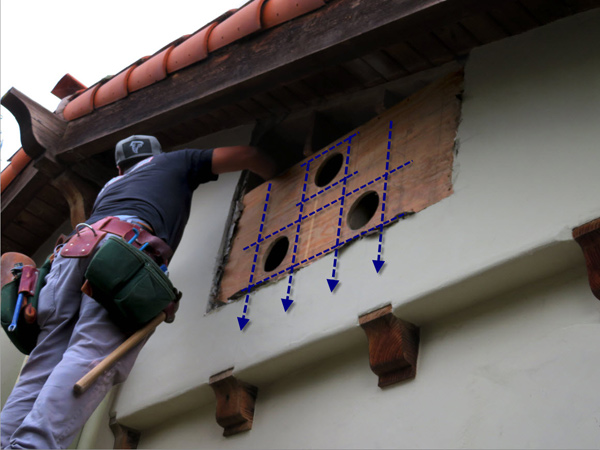
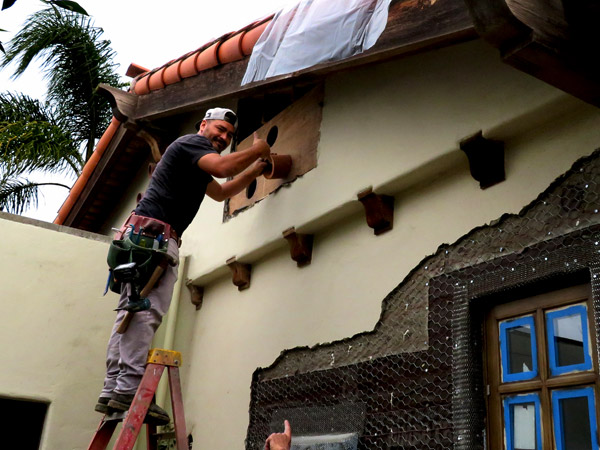
Above: An informally marked up photo and easy to understand infographic. The Artisan carpenter is in the process installing supportive framing for the clay pipe vents. The blue lines indicate existing framing (as well as where other wood support will be installed).
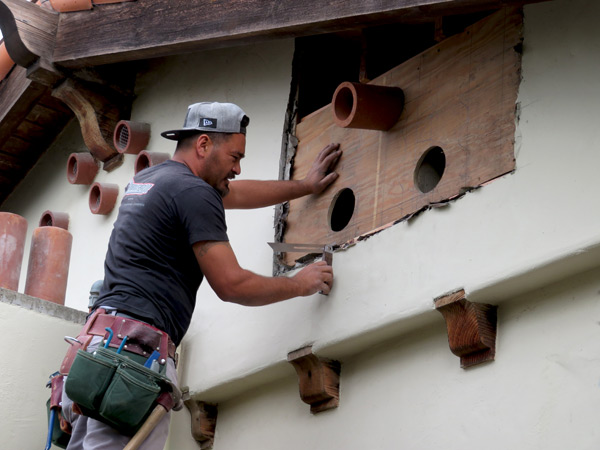
A T-bevel (available on Amazon) is an important tool for clay vent installation. Professional builders use them to establish a consistent angle, pitched across all clay vents. Here he works on the hole openings the clay pipe vents will nest in. The holes were made by first tracing the outside diameter of the clay pipe on the small section of 5/8″ thick structural plywood. To make the holes easier to cut, the plywood was brought down to ground level and jigsaw cut on a work table.
As an Amazon Associate, I earn commissions from qualifying purchases.
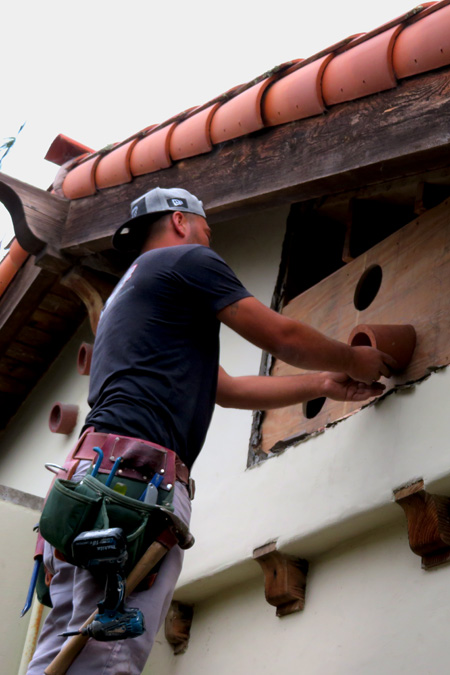
The slanted angle you will establish for the clay vents is both aesthetic and functional. Functionally, the down angle keeps rain from entering your home. It is best if you have a helper when you get to this point. Inside the attic space another carpenter is securing the clay vents to the wood framing, using Pipe Strap and drywall screws.
A Jeff Doubét recommended product for designing and building your charming, high-quality Spanish style home +landscape. A 240 page, full color Coffee Table Book.
As an Amazon Associate, I earn commissions from qualifying purchases.
Weatherproofing Clay Vents During Installation
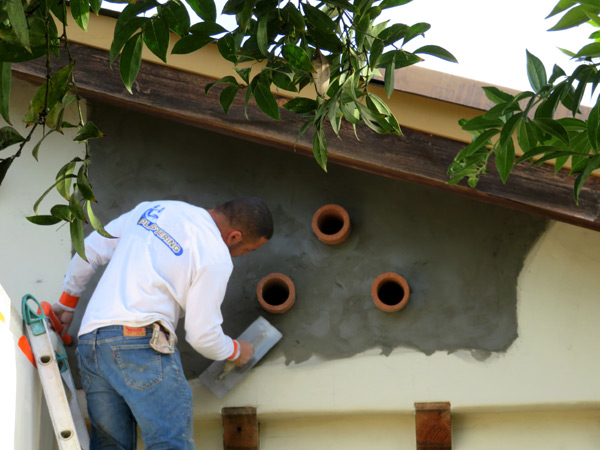
Below are tips for weatherproofing a clay vent installation. RE: Stucco Patching- notice the “roughly random” broken edge of the plaster. This is intentional. The new black weatherproof paper is tucked behind the lighter gray (existing paper).
This random in and out stucco patch technique also enables an interlocking effect. The new stucco locks into the existing stucco surfaces, which will help reduce the chances of cracking in the future. There are multiple steps in weatherproofing your clay vents. The first one is shown in the photo below. Caulking around the clay pipe seals the subtle gaps between the vents and the plywood supporting them.

The next step is to randomly break out more of the surrounding plaster. Then, 60 min. asphalt-saturated paper is installed to protect the plywood. Then 20 gauge plain stucco mesh will be attached. This is the familiar “chicken wire” that supports the first coat of plaster.
Stucco Tips: Clay Vent Installation
Scroll more photos for additional tips and tricks to make your clay vent installation go as smooth as possible. Be sure to wrap the clay vents in plastic and orange tape. Terracotta clay is very porous. This step saves difficult and tedious clean up at the end of your project.
As an Amazon Associate, I earn commissions from qualifying purchases.

These photos show a first “Scratch Coat” (right of the buckets). See how it is interlocking with the jigsaw shape of the original plaster? That’s what you want. In these pix, the stucco crew begins the second, brown coat on top of the first scratch coat.

Above + Below: The second coat of stucco is applied “unusually sloppy” and then left alone to set up for a bit. At just the right time, the pro plasterer begins using a Foam Float to begin working out the subtle texture detail.
As an Amazon Associate, I earn commissions from qualifying purchases.

Here is a close up of the float process. The Artisan starts by knocking down the sharp trowel marks in the wet plaster. The foam float is dipped in water, which helps smooth out the roughly applied second coat.

Once the second coat of plaster is mostly the way he wants it, the tape and plastic is removed from the terracotta clay vents.

This gives the plasterer a chance to refine the stucco around the clay pipes, as he continues troweling the Santa Barbara mission finish.

Here the team works, and the project progresses. The Artisan on the right is applying a heavy second coat of plaster over the first. There is always a support person on the ground, mixing the next round of wet plaster.
Crafting the Fine Details of a Spanish-style Home
As you can see in this series of photos- clay vent installation is an artistic process. To achieve the finest of details, the pros go back and forth between a multitude of tools. Foam floats, steel trowels and straight edges.
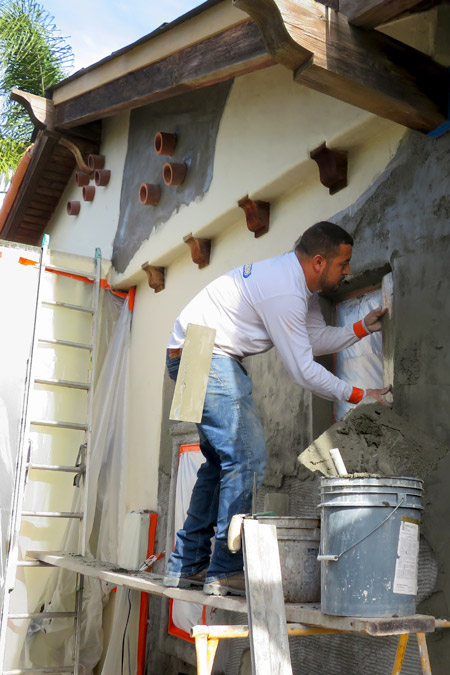
Here, the pro plasterer uses a Kraft Tool to apply wet stucco to the inside opening of a window frame. Spanish-style homes typically do not have wood trim on windows and doors. The plaster is wrapped into them.
As an Amazon Associate, I earn commissions from qualifying purchases.

More detailing around the clay vents is achieved with the sharp edge of the steel trowel.

Meanwhile… up on the roof a hardworking roofer does repair work on a section of the Spanish clay roof.

This Modern Master in Plaster is clearly in “flow”. Time flies as he works his craft. These experts are always in demand and I see them working on high quality projects all over town. Santa Barbara, CA is a wonderful place for the artistic trades!

Once the plaster cures for a couple of weeks, this exterior facade will be painted. One last Pro Tip: be sure to protect the openings of your vents with rigid mesh (available on Amazon). A subtle barrier for nesting birds, and a mice “no can do” declaration.
As an Amazon Associate, I earn commissions from qualifying purchases.