


Jeff Doubét shares Spanish shed design ideas, photos and how-to tips for creating a high quality projects. See the construction process and materials used in building this beautiful and iconic red tile roof shed. Go behind-the-scenes for a first hand account of how this Spanish shed was designed and built in Santa Barbara, CA.
LISTEN TO JEFF DOUBÉT NARRATE THE FEATURED PHOTO, ABOVE.

BEFORE Photo: This is the backyard space where I suggested a Spanish-style accessory structure would ideally be built. It was a nice flat area, and the new shed would be seen from many different vantage points from inside the main house.

AFTER Photo: Several months later, the vision for a charming Spanish-style shed was realized. Here is the completed project after the landscaping was installed.
The History Behind Jeff Doubet Spanish-style Shed Design 1
I never thought a couple of design sketches would end up turning into a built project garnering worldwide attention. But it did!

I had proposed the custom shed design to a local Montecito real estate investor/builder. It was a creative moment in time, as I thought of ways to help him maximize profits on his project.

He specifically purchased the property as an investment. He planned to redesign the fixer upper home, make those upgrades and then resell the home for a profit. Looking back, it became much more than that. It was an amazing work experience with guys I grew to know, like and trust.

The main house and lot were relatively modest for the neighborhood it was in. The shed was an idea for increasing the perceived value of a completed project. For the new homeowner, it would provide additional space and the Spanish shed dramatically improved the landscaping, as well.
Direct links to Spanish home and landscape product recommendations and installations.
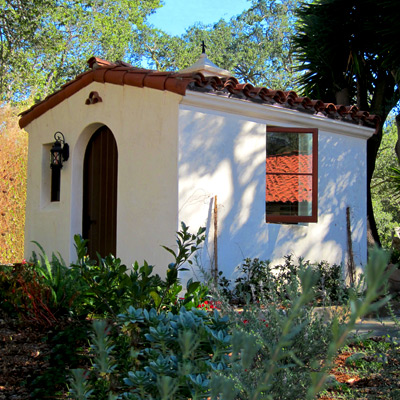
I designed the shed to use the same building techniques and materials I specify on other custom Santa Barbara Spanish-style homes I am involved with. Deeply recessed front door and windows, integral color exterior plaster and an authentic red tile clay roof, etc. For this “flip”, I also specified a relatively affordable Spanish-style wall mount light from Amazon. It is a lantern style light I have recommended in the past, and we installed them on the main house, as well.
A Jeff Doubét recommended product for designing and building your charming, high-quality Spanish style home +landscape. A 240 page, full color Coffee Table Book.
As an Amazon Associate, I earn commissions from qualifying purchases.
PLANNING YOUR SPANISH SHED LAYOUT
When designing and building your own Spanish style shed project, carefully consider where you will locate it. High quality Spanish sheds are expensive to build, so you will want to get the most out of your investment.

Think about the shed as a new focal point within your property. For this project, I recommended placement at the back of the property and within earshot of a seasonal creek.
Time-lapse Photos: Construction of Quality Spanish Shed
This Spanish-style shed was built on a post and pier foundation. Wood floor beams were cut and anchored to concrete pad footings. Then, a structural plywood floor was built on top.

*NOTE: Concrete perimeter foundations and concrete slab foundations are next level up improvements for custom Spanish-style sheds. These foundation types are more costly, but are longest lasting. Check with your architect and local building department for your specific project requirements which may include reviewing your local building code, soil type etc. Each foundation type has pros and cons, many which are based on your budget and the intended use of your shed.

These photos show how the Spanish shed was framed, just like a standard home. Stick framed using 2 x 4 lumber, with king and trim studs are supporting headers above windows and doors. ABOVE: the first stage of weatherproofing a wood window and the arched front door framing.

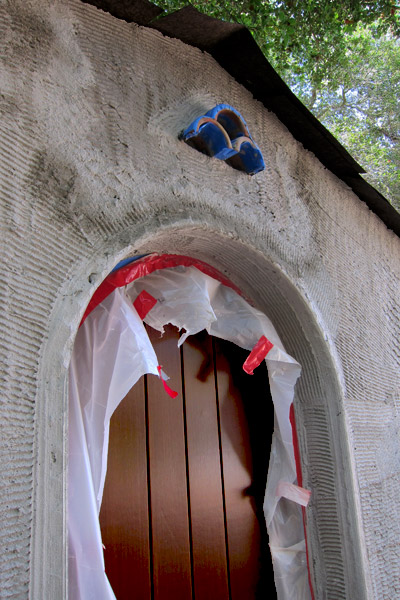
ABOVE: This is how an arched opening was framed for the reclaimed wood front door. To deeply recess this door and the side window next to it, additional framing was built inside the shed. This technique provides “depth” to the door and window. Stone masons create a stone threshold and sandstone step by hand chiseling two local sandstone boulders.

After the framing stage was completed, the exterior plastering crew began weatherproofing in prep for stucco. Here, they use Line Wire and 60 minute building paper. On page 124 – 125 of my 240 page book, I share my original design drawing and additional photos of this custom shed build.
More Spanish Shed Construction and Design Advice by Jeff Doubet
BELOW: The custom framing for the Spanish-style cupola is taking place. This special design element was hand-built on site using traditional 2 x 4 lumber and structural plywood.

To save roofing costs on the shed and main house, an “S-tile” red clay roof was installed. Here, a stack of S-tile is loaded onto the roof of the house. My Spanish Roofing Collection 2 article is where I share professional tips and tricks for making an S-tile Spanish roof look great.
When money is not as much a concern, I recommend a 2 piece Mission tile roof. Learn more at my post Spanish Roofing: How to Achieve a Santa Barbara Style Roof, here.
More Spanish-style Details Built Into a High Quality Shed
The custom designed Spanish-style cupola receives a first coat of stucco by a talented Artisan.

I purchased a stock cast iron finial and had a welder weld a piece of rebar to the bottom of it. Inside the wood framed cupola, a short piece of 4 x 4 lumber was incorporated. A hole was drilled in the top of the 4 x 4 to support the weight of the finial.
*As an Amazon Associate, I earn commissions from qualifying purchases.

ABOVE: The first (scratch) coat of plaster has been applied to the exterior of the shed. Saw horses in the foreground support the cement coated foam coving that will be installed next.
This close-up photo shows how 6 inch clay drain pipe was cut in half, and then into 4 inch sections to create the decorative design detail I had sketched for above the wood plank front door.

ABOVE: Learn more about how a cement coated foam eave details. Here, they were adhered to the scratch coat of the plaster. Then, after the brown coat (second coat of plaster), a final coat of integral color plaster was applied (shown above). Now the painters are using paper to protect the new plaster finish. They are sealing and staining of the wood windows and door jamb.

Here you can better see how the first course of Spanish roofing on the shed was accomplished using two-piece Mission barrel tiles. You can also see how shadow lines in plaster were created at the installed rake tiles on the gable end, above the front door.
More Jeff Doubet Spanish Shed Photo Resources
Click here for a sneak peek at a high end Spanish style shed interior developed right in Montecito. Also… check out this two story Spanish shed I designed for someone from Spain.
In the meantime, here are a few more completed Spanish shed photos with the landscaped garden surrounding it.

Once the shed was completed, a drought tolerant landscape was installed. Oklahoma flagstone was specified for stepping stones and pathways. As an accent detail, local sandstone was hand chiseled to make stone curbing. An attractive way to retain the mulch in the planting beds.

Other custom shed resources by Jeff Doubet: I am proud of designing sheds that have been featured on Oprah.com and inside the pages of Santa Barbara Magazine (page 80). You can also see additional Jeff Doubet Spanish-style shed designs, below.