

Jeff Doubet shares before, during and after photos showing how quality plaster registers are built into a Spanish home interior in Santa Barbara, California. Today I share how custom plaster register grilles were incorporated into a Spanish-style bedroom design to enhance the room with additional layers of detail.
CLICK [+] to Read Common Questions About Plaster Registers & Translate
Based on the Jeff Doubét article: ‘Plaster Registers: Quality Details Built into Spanish Homes’
1. What are plaster registers and why are they used in Spanish-style homes?
Plaster registers are thick, custom-fabricated decorative HVAC vent covers that have been incorporated into Santa Barbara Spanish homes and businesses for over 100 years. Unlike standard metal vent covers you can purchase on Amazon, these registers are typically 1.5 to 2 inches thick and are made from a specially formulated plaster cast as a ‘block.’ The decorative perforated design is then cut into the panel using a CNC waterjet.
They serve both functional and aesthetic purposes—providing ventilation for heating and air conditioning systems while adding authentic Spanish Colonial Revival architectural detail to interior walls. These registers can be installed throughout a home’s interior and are valued for their artistic nature and ability to elevate the overall design of Spanish-style spaces.
2. How thick are plaster registers, and can I customize the design?
Standard plaster registers are typically 1.5 inches thick, though custom thicknesses can be specified. In the Santa Barbara project featured in the article, Jeff Doubét specified an extra-thick 2-inch register to create additional depth in the perforated detail for enhanced visual impact.
Almost any design can be cut into a plaster panel, provided it’s first approved by the manufacturer for structural viability. The design flexibility allows homeowners to match specific Spanish Colonial Revival patterns or create custom motifs that complement their home’s architectural style. The manufacturer will analyze your design to ensure it maintains adequate structural integrity while providing proper air flow.
3. What preliminary planning is needed before installing plaster registers?
Installing plaster registers requires careful coordination between several professionals and early-stage planning. Key preliminary steps include:
• Working closely with the plaster register manufacturer to understand technical specifications and installation requirements
• Coordinating your decorative grille design with custom galvanized ductwork geometry—the design must be compatible with proper air flow
• Ensuring your HVAC system is properly engineered for the specific register design you choose
• Finding a detail-oriented General Contractor experienced with this type of specialty installation
• Planning for wall framing that allows ‘tolerance’ for shimming and leveling the panels
The manufacturer will provide specific technical details about panel dimensions, mounting systems, and integration requirements that must be incorporated before you get too far into your project.
4. How are plaster registers secured to the wall?
Plaster registers are secured using a combination of manufacturer-supplied metal ‘Z’ clips and construction adhesive. The installation process involves several key steps:
The panels are fabricated with a routed and stepped edge (typically 5/8-inch thick) that creates a ledge. This design allows the thinner outer edge of the panel to rest on the wood framing while the thicker section recesses into the wall. The drywall around the opening must be cut back by approximately 3/4 to 1 inch from the ductwork opening to expose the wood framing for a flush mount.
The metal Z clips fit into a secondary routed groove on the panel’s front edge and are screwed into the surrounding wood framing. A bead of construction adhesive is also applied along the backside of the panel ledge for additional strength. The panel is carefully shimmed using cardboard drywall shims to ensure it’s perfectly level, plumb, and flush with the wall surface. After securing, the gaps between the panel and adjacent walls are filled with joint compound and fiberglass mesh tape, then finished to create a seamless integration.
* See complete FAQ list at bottom of article

Thick cement grills and plaster registers have been incorporated into Santa Barbara Spanish homes and businesses for well over 100 years. My first introduction to the genre was back in the early 1980’s. I lived in a 1920’s Montecito home that had beautiful window grilles.

I was so impressed with the artistic nature of these functional items, that I began to incorporate them into my own design projects in 2003. Scroll to learn more about decorative window grille and plaster vent grille upgrades you can make.
Direct links to Spanish home and landscape product recommendations and installations.
Plaster Registers Before and After
In a collection of articles I have written on the subject, I wanted to focus on the before, during and after process of incorporating plaster registers and vents into any project.

BEFORE PHOTOS: For this particular Santa Barbara home, we were redesigning and remodeling interior spaces. This article focuses on the plaster registers we incorporated into the primary suite. The interior walls were stripped to the studs making way for a large walk-in closet and new luxurious bath.

You can see the heating and air conditioning flexible duct work In the upper right corner of the photo ABOVE. An extra thick wall was framed for the aesthetic upgrade of the opening, as well as housing a sliding pocket door.
For new construction projects, the methods and steps are similar. *Be sure to consult with your architect, local building dept and general contractor for the technical details of your specific project. These photos are shown for general reference only.

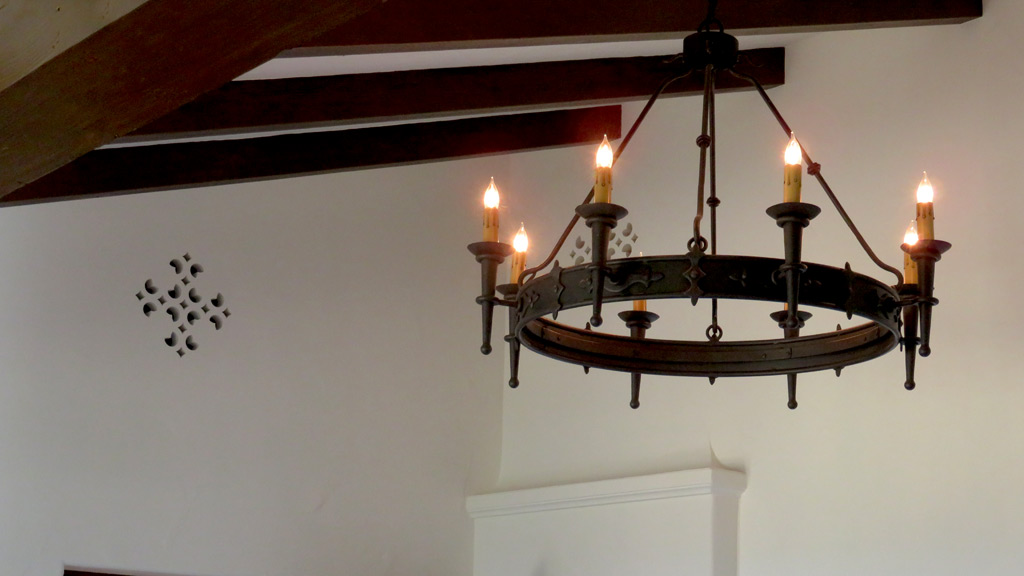
AFTER PHOTO: The completed Spanish bedroom entrance remodel includes a large Spanish Colonial Revival iron chandelier. Please scroll the dozens of photos below, to learn more about how you can accomplish a similar, stunning result.
A Jeff Doubét recommended product for designing and building your charming, high-quality Spanish style home +landscape. A 240 page, full color Coffee Table Book.
As an Amazon Associate, I earn commissions from qualifying purchases.
What Are Plaster Registers, and Where Can They Be Installed?
Plaster registers are thick custom fabricated, decorative HVAC vent covers. Typically, they are 1.50″ thick. An upscale alternative to standard duct air vent covers you can purchase on Amazon. They are fabricated by first casting a special formulated plaster as a “block”. The perforated design that creates the vent is cut into the block panel using a CNC waterjet.
As an Amazon Associate, I earn commissions from qualifying purchases.
Almost any design can be cut into a panel of plaster, provided they are first approved by the manufacturer, who will analyze the structural viability of your design.

ABOVE: Three custom plaster register vents were well packed in foam when I opened the shipping crate. Plaster vents can be installed throughout the interior of a home. I have even specified them in areas of a house just for their aesthetic value on a wall (not associated with a heating or other functional use).

For this project, I wanted to create a vent with extra depth in it’s perforated detail. To accomplish this, I specified the plaster registers in a non-standard 2″ inch thickness.
Jeff Doubet recommended product(s) for designing and building a quality Spanish-style home and landscape.
As an Amazon Associate, I earn commissions from qualifying purchases.
Preliminary Construction Steps for Incorporating Plaster Registers
There are some basic preliminary steps you will need to take to build custom plaster registers into your own project. As I wrote in a previous article, it is important to work closely with the manufacturer to understand the technical aspects you will need to know and incorporate, before you get too far into your project.

The design you choose for your plaster registers will need to coordinate with the custom design of your galvanized ductwork. This is standard type ductwork, but the geometry will need to be compatible with the specific air flow supplied through the decorative grille design.

ABOVE CONSTRUCTION PHOTO: Our heat and AC ductwork were sized and engineered to our specific register design. The HVAC system installed in the house is an important calculation. ABOVE: The rough-in of the duct work is complete, and 5/8″ drywall has been installed on the walls and custom door surround.

Here is a close up photo of the galvanized box and duct. Notice how deep this box is? Again, it is designed for the volume of air flow, and function of our specific plaster register cover design.
Jeff Doubét Design Tip: Make sure you paint the interior of your duct work with a satin flat black paint. That way, when you look up into the plaster register, you will not see bright metal. The black paint creates the dark “shadow” when looking inside the perforations.
How To Install Plaster Registers With Custom Clips
A lot of my clients are intrigued with incorporating custom plaster register vent grilles into their projects. But they don’t understand how they are installed, and there is often trepidation. I took these photos on the job site to help you visualize how they are installed.

Here, one of our custom 2″ inch thick plaster registers has been secured in place with the manufacturer supplied metal clips. The “gap” between the panel and the adjacent wall surfaces will soon be filled in with drywall, fiberglass mesh tape and additional coats of drywall mud.

ABOVE: This photo shows how the plaster register manufacturer fabricated the custom, 2″ thick panel with a routed and stepped edge of 5/8″ thick.

ABOVE: Another close up photo of the front edge of the panel. See how it has a thin frame routed all around? This allows you to install the metal “Z” clips along the edge. It gives you many options for how best to secure the panel to the adjacent wood framing.
Installation Details for Plaster Registers in Spanish homes
This photo below shows how you will need to cut back the 5/8″ drywall by approximately 3/4″ – 1″ (from the opening of the ductwork box).

The process exposes the wood framing, allowing a flush mount of the thick panel (to be even with the surface of the wall). You can also see here how the plaster vent panel is secured using the manufacturer supplied “Z” clips.

This 2″ thick grille was supplied with a “ledge” edge detail. You can’t see it in this photo, but imagine the 2″ thick panel has a routed edge on the backside, as well. This allows the thinner outer edge of the panel to rest on the wood framing, while the remaining thick section of the panel is recessed into the wall. Further, the (secondary) front edge groove of the panel is needed for the installation of the “Z” clips. Scroll to see more images of this procedure in action.

ABOVE: A zoomed in view of the metal clips securing the decorative plaster register in place. Our General Contractor also ran a bead of construction adhesive along the backside of the panel “ledge edge” for extra strength for holding the panel in place within the wood framing.
A direct link to Spanish-style products on Amazon and project overviews where installed.
More Installation Tips and Tricks for Decorative Plaster Grilles
I recommend finding a General Contractor who is detail oriented, as installing decorative plaster HVAC grilles and panels requires extra planning. The GC’s I have worked with are smart enough to build in some “tolerance” in their framing. This allows a bit of wiggle room for them to move the panel around a bit. Most importantly: to level the design on the wall.

Nothing is more frustrating than to see an out of level decorative element installed on a wall. To avoid this, cardboard drywall shims are used to adjust the grille panels vertically and horizontally, as well as to be “plumb” with the wall itself.
As an Amazon Associate, I earn from qualifying purchases.

Here is how the Spanish built-in shelving turned out. An antique Spanish Colonial Revival chair was placed in front of it, along with a women’s handmade leather bag placed near it.
[View Women’s Leather Hand Bags on Amazon]
As an Amazon Associate, I earn from qualifying purchases.

Now that the plaster HVAC panels are shimmed and secured with construction adhesive and metal “Z” clips, the drywall gaps will need to be filled in.

The way we fill the bulk of these gaps is with 20 min. joint compound mixed with general all purpose drywall mud. The 20 min. sets up fast. Once dry, fiberglass mesh tape is applied over the patched areas before final layers of drywall mud are applied. The mesh helps prevent cracks from forming around the panel installation.
As an Amazon Associate, I earn commissions from qualifying purchases.
Refining The Installation Of Decorative Plaster Vents
Once the plaster register has been completely integrated into the wall, the drywall team follows up with the final details.

Their final work (seen above) feathers the drywall mud on the wall to the surface of the vent grille panel. See a photo of Spanish home designer Jeff Doubét finalizing the installation of a Spanish plaster vent grille, HERE.

ABOVE: A close up photo of the plaster register after a final topping coat of joint compound has been applied, dried and sanded. This is what a completed installation of a plaster register looks like just before the wall is painted.

MORE COMPLETED PROJECT PHOTOS


Explore more access to other Spanish home designer Jeff Doubét photos, designs and pro tips for cement and plaster grilles.
Future Episodes for Building Spanish Style Interiors
I invite you to continue visiting my Creating Spanish Style Homes Photo Blog, as I add more intriguing projects, site visits and teaching moments of how high-end Spanish style interiors are designed and built.

For example: Beyond the door (on the left) is a gorgeous Spanish style master bath. At some point I will be sharing that portion of this remodel in a future episode.

CLICK [+] to Read FAQ’s & Translate
Frequently Asked Questions: Plaster Registers in Spanish-Style Homes
Based on the Jeff Doubét article: ‘Plaster Registers: Quality Details Built into Spanish Homes’
1. What are plaster registers and why are they used in Spanish-style homes?
Plaster registers are thick, custom-fabricated decorative HVAC vent covers that have been incorporated into Santa Barbara Spanish homes and businesses for over 100 years. Unlike standard metal vent covers you can purchase on Amazon, these registers are typically 1.5 to 2 inches thick and are made from a specially formulated plaster cast as a ‘block.’ The decorative perforated design is then cut into the panel using a CNC waterjet.
They serve both functional and aesthetic purposes—providing ventilation for heating and air conditioning systems while adding authentic Spanish Colonial Revival architectural detail to interior walls. These registers can be installed throughout a home’s interior and are valued for their artistic nature and ability to elevate the overall design of Spanish-style spaces.
2. How thick are plaster registers, and can I customize the design?
Standard plaster registers are typically 1.5 inches thick, though custom thicknesses can be specified. In the Santa Barbara project featured in the article, Jeff Doubét specified an extra-thick 2-inch register to create additional depth in the perforated detail for enhanced visual impact.
Almost any design can be cut into a plaster panel, provided it’s first approved by the manufacturer for structural viability. The design flexibility allows homeowners to match specific Spanish Colonial Revival patterns or create custom motifs that complement their home’s architectural style. The manufacturer will analyze your design to ensure it maintains adequate structural integrity while providing proper air flow.
3. What preliminary planning is needed before installing plaster registers?
Installing plaster registers requires careful coordination between several professionals and early-stage planning. Key preliminary steps include:
• Working closely with the plaster register manufacturer to understand technical specifications and installation requirements
• Coordinating your decorative grille design with custom galvanized ductwork geometry—the design must be compatible with proper air flow
• Ensuring your HVAC system is properly engineered for the specific register design you choose
• Finding a detail-oriented General Contractor experienced with this type of specialty installation
• Planning for wall framing that allows ‘tolerance’ for shimming and leveling the panels
The manufacturer will provide specific technical details about panel dimensions, mounting systems, and integration requirements that must be incorporated before you get too far into your project.
4. How are plaster registers secured to the wall?
Plaster registers are secured using a combination of manufacturer-supplied metal ‘Z’ clips and construction adhesive. The installation process involves several key steps:
The panels are fabricated with a routed and stepped edge (typically 5/8-inch thick) that creates a ledge. This design allows the thinner outer edge of the panel to rest on the wood framing while the thicker section recesses into the wall. The drywall around the opening must be cut back by approximately 3/4 to 1 inch from the ductwork opening to expose the wood framing for a flush mount.
The metal Z clips fit into a secondary routed groove on the panel’s front edge and are screwed into the surrounding wood framing. A bead of construction adhesive is also applied along the backside of the panel ledge for additional strength. The panel is carefully shimmed using cardboard drywall shims to ensure it’s perfectly level, plumb, and flush with the wall surface. After securing, the gaps between the panel and adjacent walls are filled with joint compound and fiberglass mesh tape, then finished to create a seamless integration.
5. What are some important installation tips for achieving a professional result?
Several professional techniques ensure high-quality plaster register installation:
Paint the ductwork interior flat black: Before installing the register, paint the inside of the galvanized ductwork with flat black paint. This prevents bright metal from showing through the perforated design and creates attractive dark ‘shadows’ when looking into the vent openings.
Use cardboard drywall shims: These allow precise adjustment of the panel vertically, horizontally, and for alignment with the wall plane. Taking time to properly level and plumb the panel is crucial—nothing is more frustrating than an out-of-level decorative element on a wall.
Proper drywall finishing: Fill gaps with a mixture of 20-minute joint compound and all-purpose drywall mud for the bulk fill. Once dry, apply fiberglass mesh tape over patched areas to prevent cracking. The final layers should feather the drywall mud from the wall surface to the plaster panel edge for seamless integration.
Work with experienced contractors: Find a General Contractor who is detail-oriented and has experience with specialty installations. They should understand the importance of building tolerance into the framing for adjustments during installation.
6. Can plaster registers be installed in locations other than HVAC vents?
Yes, plaster registers can be installed throughout the interior of a home beyond just functional HVAC applications. Jeff Doubét notes that he has specified decorative plaster panels in areas just for their aesthetic value on a wall, not associated with heating or any functional use. This flexibility allows designers and homeowners to incorporate authentic Spanish Colonial Revival architectural details anywhere they want to add visual interest and historical character.
These decorative installations follow the same mounting techniques as functional registers but without the need for ductwork behind them. This opens up creative possibilities for adding Spanish-style architectural detail to hallways, bedrooms, dining rooms, and other spaces where traditional HVAC placement might not be optimal but where the aesthetic enhancement would be valued.
7. Where can I learn more about incorporating plaster registers into my Spanish-style home project?
Jeff Doubét has been incorporating decorative plaster registers into Spanish-style home designs since 2003 and has documented numerous installations on his Creating Spanish Style Homes® website and in his 240-page book available on Amazon. His website features a collection of articles specifically focused on grilles and registers, including:
• Exterior Spanish grilles and how-to tips for incorporating them
• Plaster vent grilles and covers installed in Spanish homes
• Before, during, and after installation process documentation
• Technical specifications and manufacturer coordination guidance
For over two decades, Jeff Doubét has specialized in helping Montecito and Santa Barbara clients plan remodels, design new homes, and restore historic properties using authentic Spanish Colonial Revival methods and materials. His hands-on building background enables him to provide insights from thousands of documented architectural details and construction techniques. Those interested in Spanish home design consulting can contact him through his website: CreatingSpanishStyleHomes.com
© 2003–2026 Jeff Doubét | Creating Spanish Style Homes® | CreatingSpanishStyleHomes.com
FAQs compiled from the original article and photography by Jeff Doubét, with AI assistance